
| From the desk of Stu Harman, our support and coaching expert. In this article Stu explains how you can still produce a session report for your patient even if you forget to switch on the session recording button. |  |
One of the great features of BiteFX for Windows is the addition of the report writing capability. This feature allows you to create an archival record of your consultation, which can be used as an internal dental record, and can also be provided to your patient as a reminder of what they saw and heard during the consultation. But to start the session recording, one must first click on the “Start/stop session recording” button before beginning your consultation. Regrettably, it is virtually guaranteed that at some time, you are going to forget to click the "Start/stop session recording" button and will go through your entire consultation before realizing your error.
So, now what do you do? You might guess that you’ll have to redo the consultation all over again with or without the patient in order to create the recording. The good news is that we’ve built in the ability to reproduce a session recording without having to resort to repeating the entire presentation with the recording mode active. This blog will give you a complete lesson on how to create a session recording and we will use a hypothetical but realistic scenario to describe the process.
You created a nice custom sequence for your patient, Mary Hathaway, and spent twenty minutes with her going through your entire presentation to explain her occlusal disease and the treatment options available for her. She wants something she can take home to discuss your treatment recommendations with her husband, so your intent was to record the session and print out the session report to give her when she leaves. So, at the conclusion of the consult, you went to stop the recording by clicking on the "Start/stop session recording" button, and saw that the button icon is white  , rather than orange
  , and now realize to your dismay no session recording was created. Don’t worry, we’ve got you covered!!
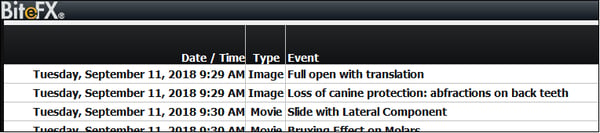
Since the BiteFX software automatically stores events (displayed pictures and played animations) each time they are shown, regardless of whether you are in record mode or not, it stored all of the events you showed Mary, including the date and time each event was shown, what kind of event it was (Image = Picture, Movie = Animation), and the title of the event.
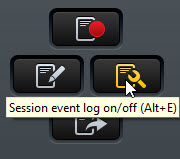
Using the information included in the event log we can now manually re-create what the software would have produced automatically had the record mode been active. We’ll start by clicking on the "Session event log on/off" button to open up our Session Recording Event Log.
The image below shows the Session Recording Event Log with no session recordings present, which is probably what you would see in this hypothetical scenario.
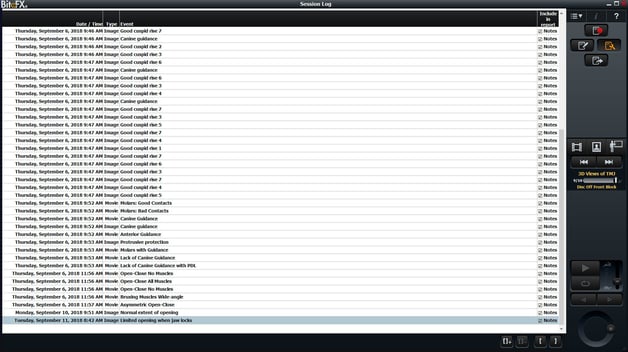
Assuming you know the date and time you started your consultation with Mary, you can use the Date and Time, and Title columns to identify the first event you showed her. Let’s say Open-Close No Muscles was the first event that was shown on Sept 11 at 9:04 AM during the consultation. Click on that line to select it.
Now go to the bottom right corner of your main screen, where you will see some buttons with bracket icons. Click on the "Add session marker" button:
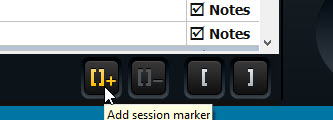
A dialog box will open so you can name the session recording. Type in any name you wish; here I have typed in the last name of our hypothetical patient, "Hathaway". If you want, you can even edit the date and time values so that it matches when the consult actually started.
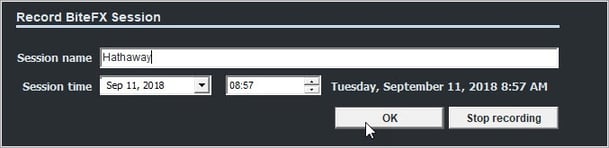
When finished, click on "OK". If you open the Session recording event log, it will now look like this:

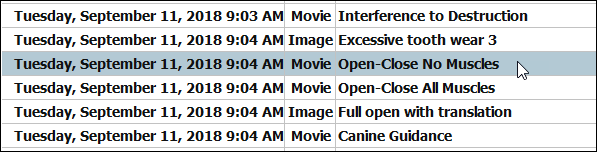
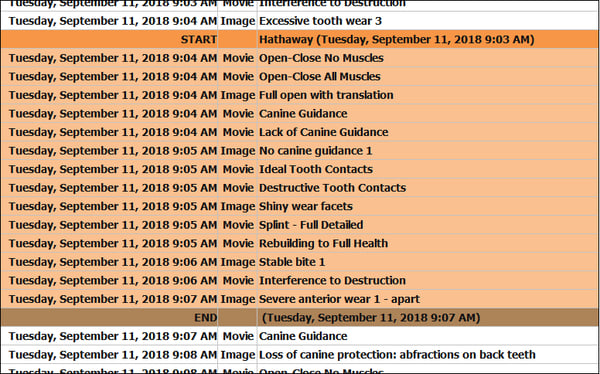
As you can see, the software has placed a START marker above the line we selected along with the session name we added, and automatically placed an END marker below that same line. Events that will be included in the session recording are now highlighted in orange. We’re off to a good start, but now we need to move the END marker so it is below the last event we showed Mary during the consultation. Click on the line that represents the last event we showed Mary to select it, let’s say it was the Severe anterior wear picture at 9:07 AM. Once again, go down to the bottom right corner of the main screen. Click on the "Add a session endpoint (])" button:

The END marker will be placed below the Severe anterior wear event line as shown in the picture below:
There you have it! We have re-created a session recording that’s ready to edit and publish just as if we had remembered to start the recording like we should have when we started the consultation with Mary.
Although it took me quite a bit of text to explain the process it's not that difficult:
- Open Session Recording Event Log.
- Select first event in session.
- Click on "Add session marker" button.
- Enter patient name (or other name for the session).
- Select the last event in the session.
- Click on the "Add a session end point" button.
Once you know you can add start and end markers, it's pretty easy.
If you need further assistance reconstructing a BiteFX session recording, please send us an email or call us at:
1-877-2BiteFX (1-877-224-8339)
International (+1) 530-582-1189
Monday thru Friday, 8am to 5pm Pacific time